1. Entwodiksyon
This manual provides comprehensive instructions for the installation, operation, and maintenance of your ASUS Prime Z270M-PLUS motherboard. Please read this manual thoroughly before installing or using the product to ensure correct setup and optimal performance.
2. Enfòmasyon sou Sekirite
Obsève prekosyon sekirite sa yo pou evite domaje kat manman an epi pou evite blese tèt ou:
- Toujou dekonekte kòd kouran an nan priz miray la anvan ou touche nenpòt konpozan.
- Wear an anti-static wrist strap or frequently touch a grounded object to discharge static electricity before handling components.
- Manyen konpozan yo nan kwen yo pou evite touche pati sansib yo.
- Asire w ke bwat òdinatè w la byen vantile pou anpeche l chofe twòp.
- Kenbe kat manman an lwen imidite ak tanperati ekstrèm.
3. Pake kontni
Verifye ke tout atik yo prezan nan pakè ou a:
- ASUS Prime Z270M-PLUS Motherboard
- SATA Cable(s)
- Manyèl itilizatè
4. Pwodwi souview
The ASUS Prime Z270M-PLUS is a micro-ATX motherboard designed for Intel LGA 1151 socket processors. It features robust hardware safeguards, advanced cooling controls, and high-speed connectivity options.
Karakteristik kle:
- Pwoteksyon 5X III: Hardware-level safeguards to ensure component longevity and reliability against electrical overloads.
- Dirije ekleraj: Customizable lighting control for PCIe slots.
- Fan Xpert 4 Core: Advanced fan controls for optimized cooling and reduced noise.
- Dual Native M.2 and NVMe PCIe RAID Support: Provides high-speed storage solutions.
- USB Kalite-C: Convenient and reversible connectivity.
- Sipò DDR4: Supports memory speeds up to 3866 MHz.
- Odyo: Realtek ALC887 8-channel high-definition audio.
- Sipò pou plizyè GPU: Features AMD CrossFireX Technology.

Figi 4.1: Anwo-anba view of the ASUS Prime Z270M-PLUS motherboard, highlighting the CPU socket, RAM slots, and PCIe slots.

Figi 4.2: Angle view of the ASUS Prime Z270M-PLUS motherboard, showcasing its various components and heatsinks.
5. Enstalasyon
5.1. Enstalasyon CPU a
- Jwenn priz LGA 1151 sou plak mèr la.
- Louvri levye priz CPU a epi leve plak chajman an.
- Aliyen CPU a ak priz la ak anpil atansyon, pou asire w ke triyang lò ki sou CPU a koresponn ak triyang ki sou priz la.
- Mete CPU a dousman nan priz la san fòse li.
- Fèmen plak chajman an epi pouse levye a desann jiskaske li bloke nan plas li.
5.2. Enstalasyon memwa (RAM)
The motherboard supports DDR4 memory up to 64GB with speeds up to 3866 MHz.
- Louvri klip yo nan tou de bout fant DIMM lan.
- Aliyen dan ki sou modil memwa DDR4 la ak kle ki nan plas DIMM lan.
- Mete modil memwa a byen fèm nan fant lan jiskaske klip yo kase nan plas yo.
5.3. Enstalasyon Aparèy Depo
The motherboard supports SATA III devices and NVMe PCIe M.2 drives.
- Aparèy SATA yo: Connect SATA data cables from your storage drives (HDDs/SSDs) to the SATA III ports on the motherboard. Connect power cables from your power supply to the drives.
- M.2 Devices: Locate the M.2 slot. Insert the M.2 drive at an angle and secure it with the provided screw.
5.4. Enstalasyon Kat Ekspansyon
The motherboard features PCIe 3.0 slots for graphics cards and other expansion cards.
- Align the expansion card with the appropriate PCIe slot.
- Press down firmly until the card is seated correctly and the retention clip locks.
- Secure the card to the PC case with a screw.
5.5. Koneksyon pouvwa
Konekte konektè pouvwa ATX 24-pin lan ak konektè pouvwa ATX 8-pin 12V ki soti nan ekipman pouvwa ou a nan pò ki koresponn yo sou kat manman an.
5.6. Koneksyon Panèl Devan an
Connect the cables from your PC case's front panel (USB ports, audio jacks, power button, reset button, LED indicators) to the corresponding headers on the motherboard. Refer to the motherboard diagram in your physical manual for exact header locations.
5.7. Panèl Dèyè Antre/Sòti
Panèl I/O dèyè a bay plizyè pò pou konekte aparèy ekstèn.
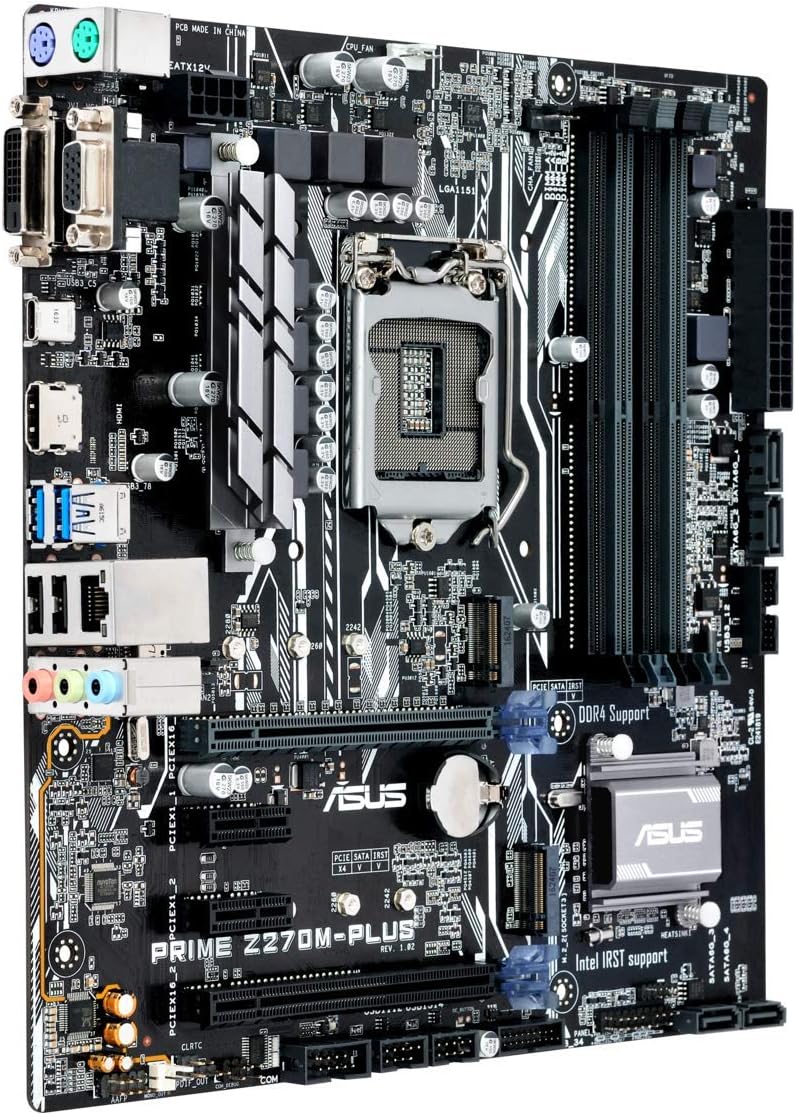
Figure 5.1: Rear I/O panel of the ASUS Prime Z270M-PLUS motherboard, showing various connectivity ports.
Pò komen yo enkli:
- PS/2 Keyboard/Mouse Combo Port
- DVI-D pò
- VGA Port
- HDMI Port
- Pò USB 3.0
- Pò USB 2.0
- LAN (RJ-45) Port
- Audio Jacks (Line In, Line Out, Microphone)
6. Opere
6.1. Premye Demaraj ak Konfigirasyon BIOS/UEFI
Upon the first power-on, the system will typically enter the BIOS/UEFI setup utility. Here you can configure system settings, boot order, and monitor hardware status. Press the DEL key during startup to enter the BIOS/UEFI.
6.2. Enstalasyon chofè
After installing your operating system, install the necessary drivers for the motherboard components (chipset, audio, LAN, graphics, etc.). These drivers are typically provided on a support DVD or can be downloaded from the ASUS official websit.
6.3. System Boot
Once the operating system and drivers are installed, your system should boot normally. Ensure all peripherals are connected correctly.
7. Antretyen
7.1. Netwayaj
Netwaye bwat PC ou ak kat manman ou regilyèman pou anpeche pousyè akimile, sa ki ka lakòz surchof ak pann konpozan yo. Sèvi ak lè konprese pou retire pousyè nan vantilatè yo, radyatè yo ak lòt konpozan yo. Asire w ke sistèm nan etenn epi debranche anvan ou netwaye li.
7.2. Mizajou BIOS yo
Tcheke sipò ASUS la regilyèman. websit pou mizajou BIOS. Mizajou BIOS yo ka amelyore estabilite sistèm nan, ajoute sipò pou nouvo pyès ki nan konpitè, oswa ranje pinèz. Swiv enstriksyon ASUS yo bay ak anpil atansyon lè w ap fè yon mizajou BIOS pou evite domaj nan sistèm nan.
NAN. Depanaj
If you encounter issues with your motherboard, consider the following general troubleshooting steps:
- Pa gen pouvwa: Ensure all power cables (24-pin ATX, 8-pin CPU) are securely connected. Check your power supply unit (PSU) for functionality.
- Pa gen ekspozisyon: Verify that your graphics card is properly seated and connected to the monitor. If using integrated graphics, ensure your monitor is connected to the motherboard's video output. Try reseating RAM modules.
- Enstabilite/Pwoblèm Sistèm: Check for overheating. Ensure all drivers are up to date. Test memory modules individually.
- Konpozan pa detekte: Asire w ke konpozan an (pa egzanp, disk di, kat ekspansyon) byen enstale epi tout kab nesesè yo konekte. Tcheke paramèt BIOS yo pou asire w ke konpozan an aktive.
- Reyajiste BIOS la: If system settings become unmanageable, you can clear the CMOS by removing the CMOS battery for a few minutes or using the Clear CMOS jumper (refer to your physical manual for location).
9. Espesifikasyon
| Karakteristik | Spesifikasyon |
|---|---|
| Non modèl | Prime Z270M-PLUS |
| CPU Socket | LGA 1151 |
| Procesè konpatib yo | Celeron, Core i3, Core i5, Core i7, Pentium (14nm CPUs) |
| Chipset | Intel Z270 |
| Teknoloji memwa | DDR4 |
| Kapasite Memwa Maksimòm | 64 GB |
| Vitès revèy memwa | Jiska 3866 MHz |
| Entèfas Depo | SATA III, Dual Native M.2 (NVMe PCIe support) |
| Fant ekspansyon | PCIe 3.0 |
| Pò USB | USB 3.0, USB 2.0, USB Type-C |
| Sòti videyo | HDMI, DVI-D, VGA (via integrated graphics) |
| Odyo | Realtek ALC887 8-chanèl High Definition Audio |
| LAN | 1x Gigabit Ethernet |
| Faktè fòm | mATX (23 x 20 x 2 cm) |
| Pwa | 900 g |
| Nimewo Modèl Manifakti | B990M80 |
10. Enfòmasyon sou Garanti
The product warranty for the ASUS Prime Z270M-PLUS motherboard is not applicable as per the provided product information. Please refer to your point of purchase or local ASUS support for specific warranty terms and conditions that may apply in your region.
11. Sipò
For further assistance, technical support, or driver downloads, please visit the official ASUS support websit la. Ou kapab jwenn lòt resous ak FAQ la tou.
ASUS Ofisyèl Websit: www.asus.com
ASUS Brand Store: ASUS Spain Store on Amazon