
Entwodiksyon
This manual provides detailed instructions for the installation, operation, and maintenance of your Venstar T1900 Residential Slimline Platinum Thermostat. Please read this manual thoroughly before attempting to install or operate the thermostat to ensure proper function and to avoid potential damage.
Enfòmasyon enpòtan sou sekirite
- Always turn off power to the heating/cooling system at the main circuit breaker or fuse box before installing or servicing the thermostat.
- This thermostat operates on 24 Volts AC. Do not connect to line voltage (120V oswa 240V).
- Si ou pa abitye ak fil elektrik, se yon teknisyen kalifye ki ta dwe fè enstalasyon an.
- Do not short circuit the terminals on the gas valve or at the system control to test the thermostat. This will damage the thermostat and void the warranty.
- Asire w tout koneksyon fil yo byen fèm epi izole pou anpeche kous kout.
Kontni pake
Verifye ke pake ou a gen atik sa yo:
- Venstar T1900 Thermostat Unit
- Materyèl pou monte (vis ak lank miray)
- Manyèl Itilizatè (dokiman sa a)
Pwodwi souview
The Venstar T1900 is a 7-day programmable digital thermostat designed for residential use. It offers precise temperature control and energy-saving scheduling capabilities. This thermostat is compatible with heat/cool, heat pump, and dual-fuel systems, controlling up to three heat stages ak de fre stages.
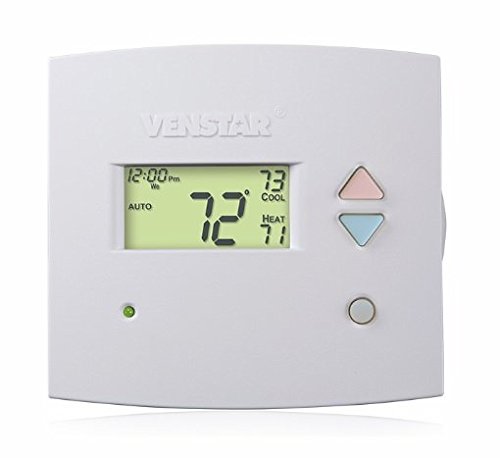
Figi 1: Devan view of the Venstar T1900 Thermostat. This image displays the thermostat's LCD screen and control buttons, indicating its slimline design.
Karakteristik kle:
- Pwogramasyon 7 jou: Allows for customized heating and cooling schedules for each day of the week.
- Sistèm konpatibilite: Works with heat/cool, dual-fuel, and heat pump systems.
- Multi-Stage Kontwòl: Manages up to three heat stages ak de fre stages.
- Kapasite kontwòl Remote: Controllable by phone using an optional add-on (sold separately).
- Automatic or Manual Operation: Provides flexibility for scheduled or on-demand temperature adjustments.
Gid enstalasyon
Zouti obligatwa:
- Tournevis (Phillips ak/oswa plat)
- Fè yon ti twou ak yon mèch ki apwopriye (si w ap enstale nouvo ankraj miray)
- Denude Fil
- Kreyon
- Nivo (opsyonèl)
1. Fèmen Kouran an
Locate the circuit breaker or fuse box that controls your heating and cooling system. Turn off the power completely before proceeding with any wiring.
2. Remove Old Thermostat (if applicable)
- Retire kouvèti ansyen tèmosta a avèk prekosyon.
- Pran yon foto koneksyon fil elektrik ki deja egziste yo pou referans.
- Label each wire with the terminal designation it was connected to (e.g., R, G, Y, W).
- Disconnect the wires and remove the old thermostat's mounting plate from the wall.
3. Mount the New Thermostat Base
- Separate the front cover of the T1900 thermostat from its base plate.
- Position the base plate on the wall where you want to install the thermostat. Ensure it is level.
- Make twou yo aliye ak yon kreyon.
- Fè twou gid si sa nesesè epi mete lank miray yo.
- Fikse plak baz tèmosta a sou miray la avèk vis yo bay yo.
4. fil elektrik
Connect the wires from your HVAC system to the corresponding terminals on the T1900 thermostat base. Refer to the wiring diagram provided with your specific HVAC system for precise connections. Ensure wires are stripped approximately 3/8 inch and securely fastened under the terminal screws.
Common Terminal Designations:
- D/Rc/Rh: 24V Power (Heating/Cooling)
- C: Common (24V return)
- G: Fanatik
- An/An1: Compression Stage 1 (Refwadisman)
- Y2: Compression Stage 2 (Refwadisman)
- W/W1: Chalè Stage 1 (Chofaj)
- W2: Chalè Stage 2 (Chofaj)
- O / B: Reversing Valve (Heat Pumps)
Note: The T1900 supports various system types. Consult the detailed wiring diagrams in the full installation manual for specific configurations (e.g., heat pump with auxiliary heat, conventional multi-stagsistèm elektwonik).
5. Attach Thermostat to Base
Once wiring is complete and verified, carefully align the thermostat front cover with the mounted base plate and snap it into place.
6. Retabli pouvwa
Return to your circuit breaker or fuse box and restore power to your heating and cooling system.
Premye konfigirasyon
Upon initial power-up, the thermostat may prompt you to configure basic settings. Follow the on-screen instructions to set the current date, time, and system type (e.g., Conventional, Heat Pump).
System Type Configuration:
It is crucial to correctly configure the thermostat for your specific HVAC system. Incorrect settings can lead to improper operation or damage. Access the installer settings menu (refer to the full installation guide for specific button sequences) to select:
- Kalite sistèm: Heat/Cool, Heat Pump, Dual Fuel
- Kantite Chalè Stages
- Kantite Cool Stages
- Reversing Valve Operation: O (Cooling) or B (Heating)
Enstriksyon Operasyon
Konprann ekspozisyon an:
The LCD screen displays the current temperature, set temperature, system mode, fan mode, time, and programming status. Refer to the icons and indicators on the screen for current operational status.
Setting System Mode:
Peze a MÒD bouton pou chanje mòd sistèm ki disponib yo:
- CHALÈ: The system will operate to maintain the heating setpoint.
- KOULÈ: The system will operate to maintain the cooling setpoint.
- OTO: Tèmosta a chanje otomatikman ant chofaj ak refwadisman jan sa nesesè pou kenbe tanperati ki fikse a.
- OFF: Sistèm chofaj ak refwadisman an etenn.
Setting Fan Mode:
Peze a FANATIK button to cycle through fan modes:
- OTO: Vantilatè a ap mache sèlman lè sistèm chofaj la oswa refwadisman an ap fonksyone aktivman.
- SOU: Vantilatè a ap mache san rete, kèlkeswa si gen apèl chofaj oswa refwadisman.
Ajiste Tanperati:
Sèvi ak la UP epi DESANN arrow buttons to adjust the desired temperature setpoint. In programmable modes, this will temporarily override the schedule until the next scheduled change.
Programming Schedules (7-Day):
The T1900 allows for 7-day programming, enabling different schedules for each day of the week. This feature helps save energy by adjusting temperatures when you are away or asleep.
- Peze a PWOGRAM bouton pou antre nan mòd pwogramasyon.
- Sèvi ak la JOU button to select the day or group of days you wish to program (e.g., Mon-Fri, Sat-Sun, or individual days).
- Sèvi ak la TAN button to cycle through the four available periods: Wake, Leave, Return, Sleep.
- Sèvi ak la UP epi DESANN arrow buttons to set the desired temperature for each period.
- Sèvi ak la KENBE button to exit programming mode or save changes.
Refer to the detailed programming section in the full user guide for advanced options and specific button sequences.
Remote Control (Optional Add-on):
The Venstar T1900 thermostat can be controlled remotely via a phone using an optional add-on module (sold separately). This module connects to the thermostat and allows for remote access and control through a dedicated application. Installation and setup instructions for the remote control module are provided with the module itself.
Antretyen
Cleaning the Thermostat:
To maintain the appearance and functionality of your thermostat, periodically wipe the exterior with a soft, damp twal. Pa sèvi ak pwodui netwayaj abrazif, solvan, oswa espre chimik, paske sa yo ka domaje plastik la ak konpozan elektwonik yo.
Ranplasman batri:
The Venstar T1900 thermostat does not require batteries for operation as it is powered by the 24V AC system.
Depanaj
If you experience issues with your Venstar T1900 thermostat, consult the following common problems and solutions:
| Pwoblèm | Kòz posib | Solisyon |
|---|---|---|
| Ekspozisyon Thermostat vid | Pa gen kouran nan tèmosta a. | Tcheke disjonktè sistèm HVAC ou a. Asire w tout koneksyon fil yo byen fèm. |
| Heating/Cooling system does not respond | Incorrect system mode selected; wiring issue; system lockout. | Verify the system mode (HEAT/COOL/AUTO). Check wiring connections. Wait 5 minutes for system lockout to reset. |
| Lekti tanperati a sanble pa egzak | Thermostat location; sensor obstruction. | Ensure the thermostat is not exposed to direct sunlight, drafts, or heat sources. Clean any dust from the thermostat vents. |
| Programming schedule is not working | Program not saved; temporary override active; incorrect time/day setting. | Ensure programs are saved. Check if a temporary override is active and cancel it. Verify current time and day settings. |
| Vantilatè a ap fonksyone san rete nan mòd AUTO a | Fan mode set to ON; wiring issue. | Press the FAN button to ensure it is set to AUTO. Check fan wiring. |
If these solutions do not resolve the issue, please contact customer support or a qualified HVAC technician.
Espesifikasyon
| Karakteristik | Spesifikasyon |
|---|---|
| Mak | Venstar |
| Non modèl | Venstar T1900 |
| Kalite kontwolè | Pouse bouton |
| Karakteristik espesyal | Pwogramasyon |
| Koulè | Blan |
| Itilizasyon espesifik pou pwodwi | Heat Pump, Heater |
| Kalite Kontwòl Tanperati | Programmable, Smart/Remote (with add-on) |
| Voltage | X N ACT Volts AC |
| Kalite ekspozisyon | LCD oswa dirije |
| Metòd kontwòl | Remote (with add-on) |
| Ekleraj | Wi |
| Dimansyon pwodwi | 5.3 x 2 x 2 pous |
| Pwa atik | 0.01 ons |
| Batri obligatwa? | Non |
Enfòmasyon sou Garanti
Venstar products are manufactured to high-quality standards. This product is covered by a limited warranty against defects in materials and workmanship. The specific terms and duration of the warranty may vary. Please refer to the warranty card included with your product or visit the official Venstar websit la pou jwenn enfòmasyon detaye sou garanti a ak pwosedi anrejistreman yo.
Sipò pou Kliyan
For technical assistance, troubleshooting, or warranty inquiries, please contact Venstar customer support. You can typically find contact information, including phone numbers and email addresses, on the official Venstar websit (www.venstar.com) oubyen sou anbalaj pwodwi a.
When contacting support, please have your thermostat model number (T1900) and any relevant purchase information ready.