Entwodiksyon
Mèsi pou acha aasing the Edifier Tick Tock Retro Multifunctional Alarm Clock. This device combines a retro design with modern functionality, offering an alarm clock, FM radio, and media playback from SD cards, USB drives, and auxiliary input. This manual provides detailed instructions for setup, operation, and maintenance to ensure optimal performance and longevity of your device.
Karakteristik pwodwi
- SD card reader and USB input port for media playback.
- LCD display screen for time, date, alarm status, and input mode (SD/USB/FM/AUX).
- Alarm clock function with customizable audio sources: SD card, USB drive, FM radio, or Auxiliary input.
- Auxiliary 3.5mm input jack for connecting external audio devices.
- FM radio function with 24 preset channels for easy access to your favorite stations.
- Two 360° omni-directional full-range speakers for rich, multi-directional sound.
Kontwòl ak pò
Pò panèl dèyè
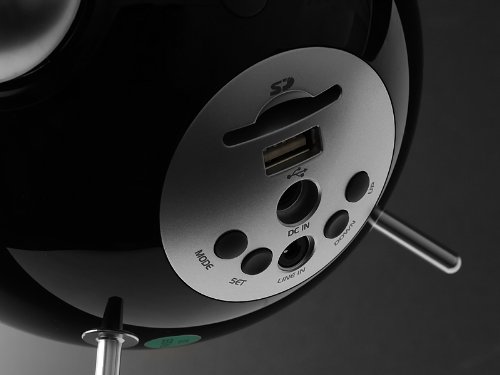
This image displays the rear panel of the Edifier Tick Tock alarm clock. Visible ports and buttons include:
- Plas kat SD: Insert an SD card for music playback.
- Pò USB: Konekte yon kle USB pou koute mizik.
- DC IN: Antre kouran pou adaptè AC ki enkli a.
- LINE IN (AUX): Antre odyo 3.5mm pou aparèy ekstèn.
- Bouton MODE: Cycles through input modes (SD, USB, FM, AUX).
- SET bouton: Used for entering settings menus (e.g., time, alarm).
- Bouton HEVE/BA: Navigate menus, adjust volume, or change settings.
Kontwòl Panel Top

This image shows the top panel controls of the Edifier Tick Tock alarm clock. These include:
- Bouton jwe/poz: Starts or pauses media playback.
- Bouton Track Previous/Next: Skips to the previous or next track during media playback. Also used for tuning FM radio.
- Volim monte / desann bouton: Ajiste volim pwodiksyon odyo a.
- Bouton SNOOZE/LIMYÈ: Aktive fonksyon repetisyon an pandan yon alam oswa ajiste klète ekran an.
Enstalasyon
- Debake: Carefully remove the alarm clock and all accessories from the packaging. Ensure all components are present: the alarm clock unit, AC power adapter, and this user manual.
- Koneksyon pouvwa: Connect the AC power adapter to the "DC IN" port on the rear of the alarm clock. Plug the adapter into a standard wall outlet. The display should illuminate.
- Premye pouvwa sou: The unit should power on automatically. If not, press the power button (if available, otherwise it's always on when plugged in).
- Antèn (Radyo FM): Extend the FM antenna located at the back of the unit for optimal radio reception.
Enstriksyon Operasyon
Mete tan ak dat
- Peze epi kenbe la SET button until the time display starts flashing.
- Sèvi ak la UP epi DESANN bouton yo pou ajiste lè a. Peze SET pou konfime epi ale nan minit yo.
- Adjust minutes using UP epi DESANN. Peze SET pou konfime.
- Continue this process to set the year, month, and day. Press SET to exit the time/date setting mode.
Mete Alam la
- Peze a SET button once (do not hold) to enter alarm setting mode. The alarm time will flash.
- Sèvi ak la UP epi DESANN buttons to adjust the alarm hour. Press SET pou konfime epi ale nan minit yo.
- Adjust minutes using UP epi DESANN. Peze SET pou konfime.
- Next, select the alarm source (FM, SD, USB, AUX). Use UP epi DESANN to cycle through options. Press SET pou konfime.
- If FM is selected, use UP epi DESANN to select a preset FM station (P01-P24).
- If SD or USB is selected, ensure a card/drive with audio is inserted. The alarm will play the first track.
- If AUX is selected, ensure an external device is connected and playing audio.
- Peze SET ankò pou aktive alam lan. Yon ikòn alam ap parèt sou ekran an.
- To deactivate the alarm, press SET until the alarm icon disappears.
- Lè alam la son, peze la SNOOZE / limyè button to activate snooze (typically 9 minutes). To turn off the alarm completely, press any other button.
Operasyon radyo FM
- Peze a MÒD peze bouton an plizyè fwa jiskaske "FM" parèt sou ekran an.
- Auto Scan and Preset: Peze epi kenbe la JWE/POZ button. The radio will automatically scan for available stations and save them to presets (P01-P24).
- Manyèl akor: Sèvi ak la TRACK ANVAN/PROCHÈ bouton pou ajiste frekans lan avèk presizyon.
- Chwazi Prereglaj: In FM mode, briefly press the TRACK ANVAN/PROCHÈ buttons to cycle through saved preset stations.
- Ajiste volim lè l sèvi avèk la UP epi DESANN buttons on the rear panel.
SD Card / USB Playback
- Insert an SD card into the SD card slot or a USB flash drive into the USB port on the rear panel.
- Peze a MÒD button repeatedly until "SD" or "USB" appears on the display. The device will automatically start playing audio files.
- Sèvi ak la JWE/POZ bouton pou fè yon poz oswa rezime lekti.
- Sèvi ak la TRACK ANVAN/PROCHÈ buttons on the top panel to skip tracks.
- Ajiste volim lè l sèvi avèk la UP epi DESANN buttons on the rear panel.
Auxiliary Input (LINE IN)
- Connect an external audio device (e.g., smartphone, MP3 player) to the "LINE IN" (3.5mm) port on the rear panel using an audio cable (not included).
- Peze a MÒD peze bouton an plizyè fwa jiskaske "AUX" parèt sou ekran an.
- Start playback on your connected external device.
- Ajiste volim lè l sèvi avèk la UP epi DESANN buttons on the rear panel, and also control volume from your external device.
Ekspozisyon klète
Yon ti tan peze la SNOOZE / limyè button on the top panel to cycle through different display brightness levels.
Antretyen
- Netwayaj: Sèvi ak yon twal mou epi sèk pou netwaye sifas revèy la. Pa sèvi ak pwodui netwayaj abrazif, sir, oswa solvan.
- Plasman: Place the unit on a stable, flat surface. Avoid direct sunlight, high temperatures, humidity, or dusty environments.
- Pouvwa: Dekonekte adaptè kouran an nan priz miray la si ou pa pral itilize aparèy la pou yon peryòd tan pwolonje.
Depanaj
| Pwoblèm | Kòz posib / Solisyon |
|---|---|
| Pa gen kouran / Ekran etenn |
|
| Pa gen son ki soti nan moun kap pale |
|
| Move resepsyon radyo FM |
|
| Alarm does not sound or plays static |
|
| Display is too bright at night |
|
Espesifikasyon
| Mak | Edifier |
| Nimewo Modèl | MF240Reto |
| Kalite ekspozisyon | LCD |
| Koneksyon Teknoloji | AUX, USB |
| Karakteristik espesyal | Alarm, Radio, SD Card Reader, USB Playback |
| Sous pouvwa | Fil elektrik |
| Materyèl | Plastik |
| Pwa atik | 0.74 liv (apeprè 0.34 kg) |
| Manifakti | Edifier USA |
Garanti ak sipò
This Edifier product comes with a 2-ane garanti manifakti. For warranty claims, technical support, or further assistance, please contact Edifier USA customer service. Please retain your proof of purchase for warranty validation.
For the most up-to-date support information, please visit the official Edifier websit.