Entwodiksyon
Thank you for choosing the Oster TSSTTVVGS1 4-Slice Toaster Oven. This compact and versatile appliance is designed to provide efficient toasting, baking, and broiling for your everyday needs. Please read this instruction manual thoroughly before operating your new toaster oven to ensure safe and optimal performance. Keep this manual for future reference.

Figi 1: Devan view of the Oster TSSTTVVGS1 4-Slice Toaster Oven.
Enfòmasyon enpòtan sou sekirite
Toujou swiv prekosyon sekirite debaz yo lè w ap itilize aparèy elektrik pou diminye risk dife, chòk elektrik, ak/oswa blesi pou moun, tankou sa ki annapre yo:
- Li tout enstriksyon yo anvan ou sèvi ak aparèy la.
- Pa manyen sifas cho. Sèvi ak manch oswa bouton.
- Pou pwoteje tèt ou kont chòk elektrik, pa plonje kòd, ploge, oswa aparèy nan dlo oswa nan lòt likid.
- Sipèvizyon sere se nesesè lè nenpòt aparèy itilize pa oswa toupre timoun yo.
- Debranche soti nan priz lè yo pa itilize ak anvan netwaye. Kite refwadi anvan ou mete oswa retire pati yo.
- Pa opere nenpòt aparèy ki gen yon kòd oswa ploge ki domaje oswa apre aparèy la fonksyone mal oswa li te domaje nan nenpòt fason.
- Pa sèvi ak deyò.
- Pa kite kòd pandye sou kwen tab oswa kontwa oswa manyen sifas cho.
- Pa mete sou oswa toupre yon gaz cho oswa recho elektrik, oswa nan yon fou chofe.
- Ou dwe pran anpil prekosyon lè w ap deplase yon aparèy ki gen lwil cho oswa lòt likid cho.
- Pa sèvi ak aparèy pou lòt itilizasyon ki gen entansyon an.
- Toujou tache ploge nan aparèy la an premye, apresa ploge kòd nan priz miray la. Pou dekonekte, vire nenpòt kontwòl sou "off", epi retire ploge nan priz miray la.
- Manje ki twò gwo oswa istansil metal pa dwe mete nan yon fou griye paske yo ka kreye yon dife oswa risk pou chòk elektrik.
- Yon dife ka rive si fou griye a kouvri oswa manyen materyèl ki ka pran dife, ki gen ladan rido, rido, mi yo, ak lòt bagay, lè nan fonksyone.
- Do not place any materials other than manufacturer’s recommended accessories in this oven.
- Pa mete katon, plastik, papye, oswa materyèl ki sanble nan fou a.
- Pa sere nenpòt materyèl, ki pa akseswa manifakti a rekòmande, nan fou sa a lè yo pa itilize.
- Pa netwaye ak kousinen metal. Moso ka kraze pad la ak manyen pati elektrik, kreye yon risk pou chòk elektrik.
- Toujou mete mouf pou dife pou chofe fou ki pwoteje ak izole lè w ap mete oswa retire atik ki nan fou chofe a.
Enstalasyon ak Premye Itilizasyon
Debake
Carefully remove the toaster oven and all accessories from the packaging. Ensure all packing materials, including any protective films or inserts, are removed from the appliance before use. Verify that all components listed in the 'Included Components' section are present.
Plasman
Place the toaster oven on a flat, stable, heat-resistant surface. Ensure there is adequate ventilation around the appliance, with at least 4-6 inches of clearance on all sides and above to prevent overheating. Do not place it directly against a wall or under cabinets.
Netwayaj inisyal
Before first use, wipe down the interior and exterior of the toaster oven with a damp cloth. Wash the baking pan and wire rack in warm, soapy water, then rinse and dry thoroughly. Ensure the removable crumb tray is properly inserted.

Figi 2: Enteryè view showing the baking pan and wire rack.
Premye Itilizasyon (Burn-Off)
It is normal for a new toaster oven to emit a slight odor or smoke during its first use. This is due to the burning off of manufacturing residues. To minimize this, operate the oven empty on the 'Bake' function at 450°F (230°C) for approximately 15 minutes. Ensure the area is well-ventilated during this process.
Enstriksyon Operasyon
The Oster TSSTTVVGS1 features user-friendly control dials for various cooking functions.

Figure 3: Control panel with temperature, function, and timer dials.
Kontwòl kadran
- Dial Kontwòl Tanperati: Located at the top, this dial allows you to select the desired cooking temperature from 150°F to 450°F.
- Kadran Seleksyon Fonksyon: The middle dial selects the cooking mode: Griye, Kwit, oswa Pen grye.
- Rele revèy: The bottom dial sets the cooking time up to 30 minutes. For continuous operation, select 'Stay On'. For toasting, turn past 10 and then back to the desired toast shade (light to dark).
Fonksyon pou kwit manje
- pen griye: Ideal for bread, bagels, and frozen waffles. Place items directly on the wire rack. Select 'Toast' function, set the temperature to 450°F, and adjust the timer for desired browning. The oven has a 4-slice capacity.
- Kwit: Use for casseroles, cookies, and reheating. Place food in the baking pan on the wire rack. Select 'Bake' function, set the desired temperature, and set the timer.
- Griye: Perfect for melting cheese, browning toppings, or cooking thin cuts of meat. Place food on the baking pan. Select 'Broil' function, set the temperature to 450°F, and set the timer. Monitor food closely as broiling is a fast cooking method.
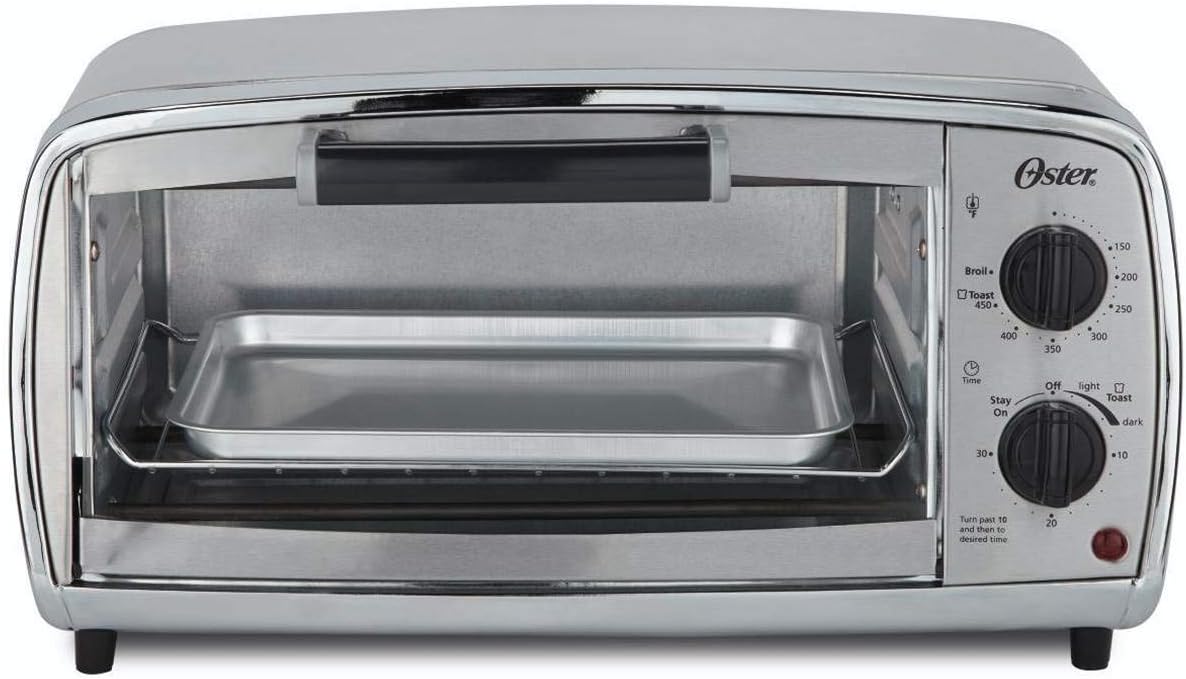
Figure 4: Toaster oven in use, showing food being prepared.
Swen ak Antretyen
Netwayaj ak antretyen regilye ap asire lonjevite ak pèfòmans optimal fou griye pen ou an.
Netwaye Enteryè a
Always unplug the appliance and allow it to cool completely before cleaning. Remove the wire rack and baking pan. The interior walls can be wiped with a damp cloth and mild liquid soap. For stubborn stains, use a non-abrasive cleaner. Do not use metal scouring pads or harsh chemicals.
Cleaning the Removable Crumb Tray
The removable crumb tray slides out from the bottom front of the oven. Pull it out, discard crumbs, and wash it in warm, soapy water. Rinse and dry thoroughly before reinserting. This feature simplifies cleanup and helps prevent grease buildup.
Figi 5: Eksploze view highlighting the removable crumb tray.
Netwaye Eksteryè a
Siye sifas eksteryè yo ak anonsamp cloth and dry thoroughly. Do not use abrasive cleaners or polishes that may scratch the stainless steel finish.
Depanaj
- Aparèy la pa limen: Asire w kòd kouran an byen branche nan yon priz elektrik ki fonksyone. Tcheke disjonktè kay ou a.
- Uneven toasting/cooking: Ensure food is placed centrally on the rack. Preheat the oven for a few minutes before adding food for more consistent results. Adjust cooking time and temperature as needed.
- Smoke or odor during operation: A slight odor is normal during first use. If excessive smoke occurs, unplug the oven immediately. Check for food spills or debris on heating elements or crumb tray. Ensure the crumb tray is clean.
- Revèy la pa fonksyone: Ensure the timer dial is turned past the '10' mark and then back to the desired setting for toasting, or directly to the desired time for baking/broiling. For continuous operation, select 'Stay On'.
Espesifikasyon
| Karakteristik | Detay |
|---|---|
| Mak | Oster |
| Nimewo Modèl | TSSTTVVGS1 |
| Koulè | Nerjaveèi asye |
| Kapasite | 4-Tranch |
| Fonksyon | Toast, Bake, Broil |
| Kalite kontwòl | Bouton |
| Wattage | 1000 wat |
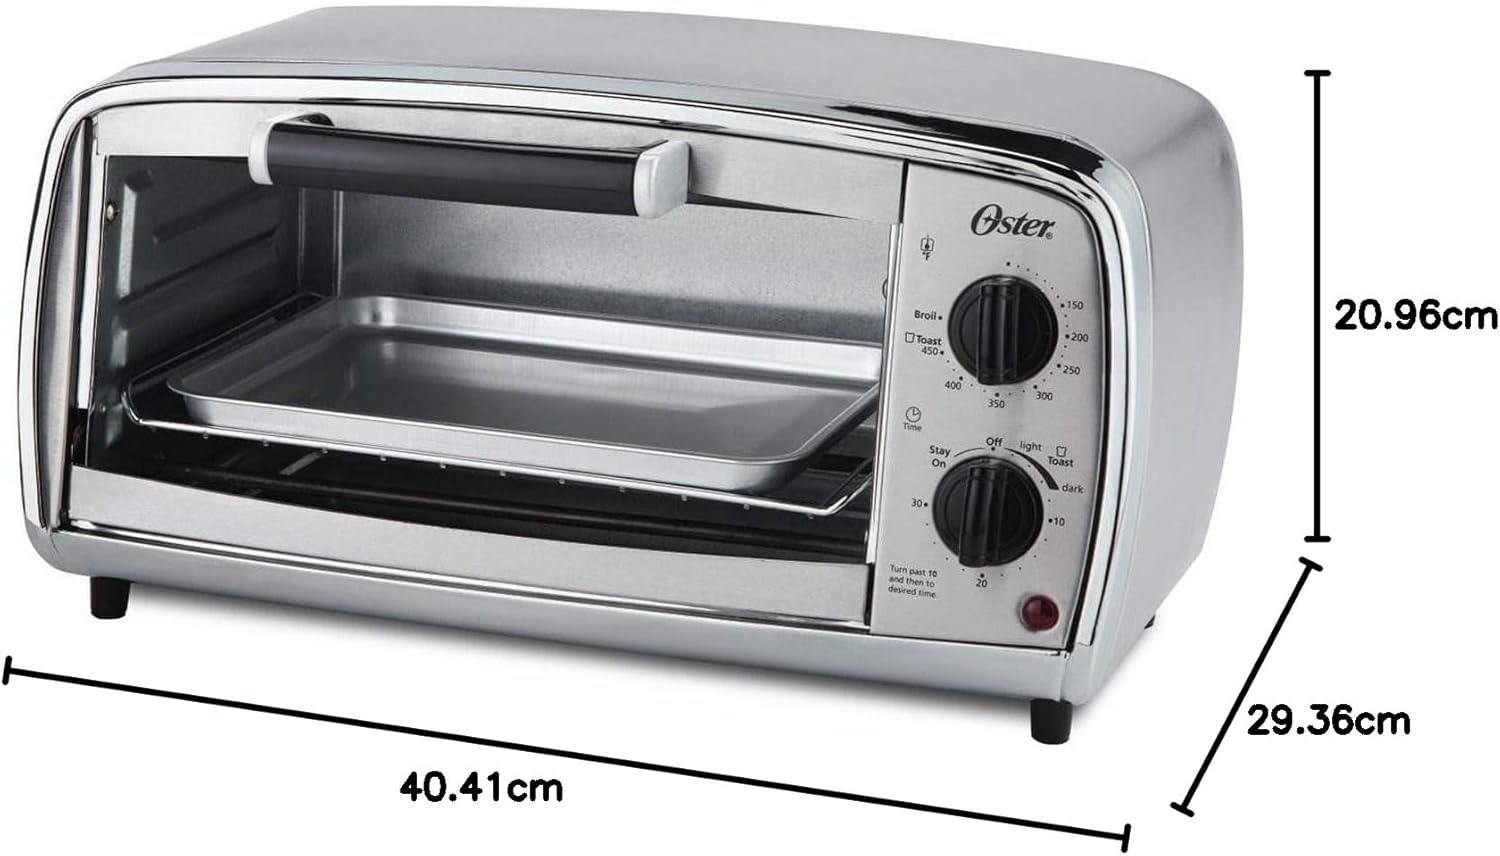
| Dimansyon pwodwi (D x W x H) | 11.56" x 15.91" x 8.25" |
| Interior Chamber Dimensions (W x D x H) | 10.87" x 7.98" x 3.46" (lower rack to upper heater) |
| Pwa atik | 1 liv |
| Materyèl | Nerjaveèi asye |
| Karakteristik espesyal | Durable, Easy Clean, Manual Controls, Removable Drip Tray, See-through Glass, Dropdown Door |
Enfòmasyon sou Garanti
This Oster TSSTTVVGS1 4-Slice Toaster Oven comes with a Garanti limite manifakti 1 zan. Please refer to the warranty card included with your product for specific terms, conditions, and registration details. Keep your purchase receipt as proof of purchase.
Sipò pou Kliyan
For any questions, assistance, or to report issues with your Oster TSSTTVVGS1 4-Slice Toaster Oven, please contact Oster customer service. Contact information can typically be found on the product packaging, the official Oster websit la, oubyen kat garanti a.